
Photo by Javier Ortiz on Unsplash
Endgame Bootcamp 2: Part 3
A Perfect Storm
Endgame Bootcamp 1: Camp Addendum
**Endgame Bootcamp 2: Part 1Part 2 Part 3 Part 4
Endgame Bootcamp: 3456 7
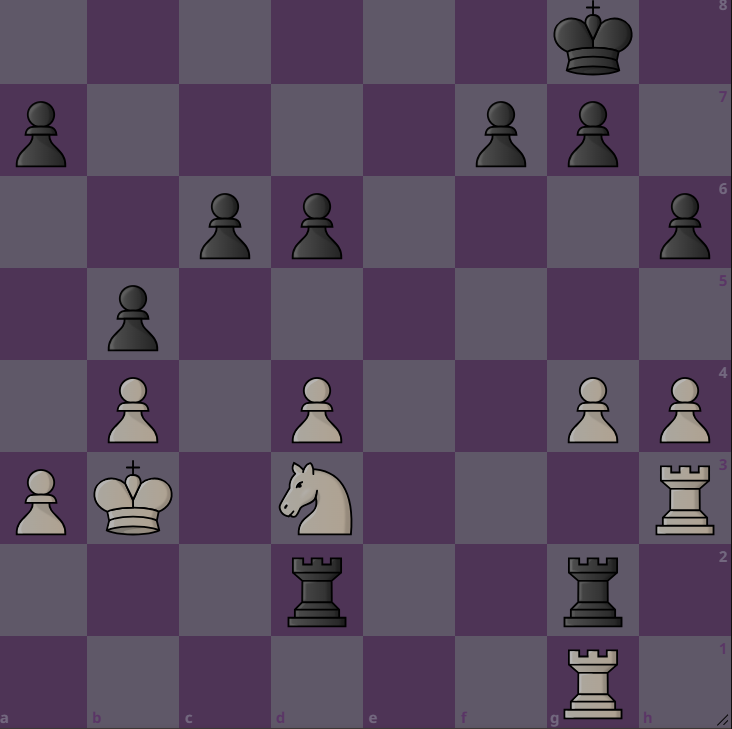
If you thought Rhh1 was a solid response instead of Rc1 or Re1....Rxe3 mates White.
Rg3 drops a piece after Rxg1 Rxg1 Rxd3 with check.
I told my friend that these options didn’t differ much in terms of strength for Black’s plan. It was all winning for White after Rc1. It came down to the weather in the Jungle that day, which happened to be Rainy. Plants had been untwined, pruned, and relocated prior to this endgame study session.
Human Analysis II
My Friend and I both agreed Black’s Rooks are misplaced in White’s Territory.
My Friend's plan for Black: Threaten promotion with the Kingside pawns. If White doesn't take the e file, Black should.
My Friend’s plan for White: save as many pawns as possible, before attacking the Queenside. Figure out the best square for the Knight.
I noticed after our analysis, that the d pawn White’s weapon, and getting the rook from c to d file ensures Victory. This highlighted lines where Black plays d5 after Rc1, eliminating White’s ability to play d5. Alternatively, If Black ignores the d pawn, they may be able to get the counterplay on the Kingside. Depends on the Weather how Black wants to proceed.
You don’t need to study every variation of an endgame, it’s the permeated ideas that will carry you to victory!
Tip: Just because you’ve analyzed an endgame, doesn’t mean you can make lightning fast moves. All it takes is “human defense” for you to slip up and make mistakes. Precise coordination of pieces in Endgames are essential. Take your time to calculate and move slowly towards the Win.
Rxg2 Sideline:
Before we jump into further analysis that began in Part 2, for Black’s response to Rc1, let’s look at the importance of Rxg2 as an alternative to Rc1.
We discover why Rxg2 is such a sharp line for White, compared to the flexibility of Rc1. The White Knight also seems to find a solid square, after a very long route.
Rc1 player: I’d rather have both Rooks in this endgame, rather than trading out the gate.
Rxg2 player: I can still confidently win with White.
The point of providing these lines, is to show White's path to victory becomes very long, and in some lines, there's no victory at all.
After Rxg2 Rxg2, White can try to take the 4th rank, but Black secures a draw and Queens!
<iframe width="600" height="371" src="
If White plays d5, instead of Rf4, the Queen is captured as soon as it appears.
<iframe width="600" height="371" src="
A quick look at a4:
Chances are slim for White even if Black accurately plays.
<iframe width="600" height="371" src="
Black hints at a small window of opportunity for White if Rxg4 first, and White could squander the opportunity if their response is d5.
<iframe width="600" height="371" src="
Best continuation for White is...d5! The recurring theme of this Part.
....cxd5 Nf4 Rxg4 Nxd5. Black is at a crossroads, and must to decide how to fight.
<iframe width="600" height="371" src="
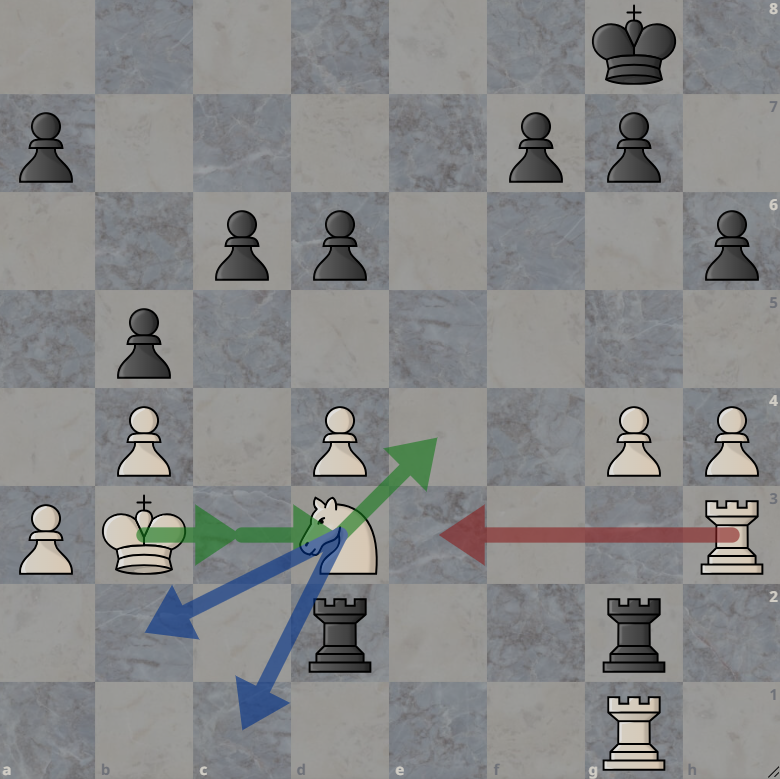
White Knight is poised to Check the Black King via e7. The White Knight is also able to go to c7, threatening b5. Note if black proceeds with a6 or Rg1 after Nxd5, then Nc7 wins the a or b pawn.
<iframe width="600" height="371" src="
Black could step to h7, avoiding the Knight check. Interestingly enough, white can play a4 in response and not give Black drawing chances.
<iframe width="600" height="371" src="
My Friend’s plan for Black comes to play with f5! A pawn sacrifice that helps the Black King step closer to the center of the board, trying to fix one of their weaknesses, and forcing the Knight to move yet again.
<iframe width="600" height="371" src="
Black must decide where to place their Rook. The position itself deserves a dedicated part, to explore the ways White is able to win.
Human Analysis III
We've ruminated on Human analysis and continue to weather the storm that is this Endgame. Planting the seeds of positional prospects along the way, like Rxg2 instead of Rc1, to be revisited on our return. My Friend's Defensive Ideas for Black and Plan for White. Black wants to threaten promotion, it can't do much with the poorly placed Rooks in White Territory. If White doesn't take the e file, Black should. He also wanted to see if White could "save" as many pawns as possible.
Another question we did not answer was: Where does White's Knight want to go? Depends on what Black does, was my response.
Refresher
Who cares that Black's rooks are in White's territory? There's no threat to the King. It's safe by stepping to c3 when required, potentially getting to e4 through d3. White's Rook on the 3rd Rank can block potential checks. The Knight protects c1 and b2 from potential checks, until it's called to duty on a better square. The Black pawns do pose threats in the long run, so we still tread carefully.
We must not put the fact that Black wants to promote to the back of our mind, instead, keep it at the forefront. Precise coordination of Whites pieces prevents Black’s threat. If you are not familiar with endings, or somewhat familiar, this can be daunting.
I remember many times when I’d be playing next to a friend, who would ask me advice on how to convert. I am guilty of this in my own games: where such position could be obtained, without the knowledge to follow through. Thankfully I’ve gotten better, and hopefully we all will with Studies like these!
Rc1 immediately attacks the weakest of Black’s pawn islands, with the threat of opening the c file. White is already up one pawn, so the threat of Rxg4 is nullified with Rxc6. Think about Rc1 Rxg4 Rxc6 Rg6.
<iframe width="600" height="371" src="
....or Rc1 d5 Rxc6 Rxg4
<iframe width="600" height="371" src="
Rc5 to fork the pawns
or Rd6 to keep Black from playing a6 while simultaneously putting pressure on the d file
Rc1 Rxg4 isn't doing anything, if Black thinks Rxc6 Rxd4 is an easy follow up, they missed the fork with Kc3.
<iframe width="600" height="371" src="
Practice to play out these positions and convert the ending is essential. Figuring out when and where to check the Black King. With what pieces to check with. What pieces will block and capture Black’s pawns to eliminate their threat of promotion.
Given the plethora of lines in this Endgame here is a Study.
The rabbit-hole went straight on like a tunnel for some way, and then dipped suddenly down, so suddenly that Alice had not a moment to think about stopping herself before she found herself falling down a very deep well.
With such an information dump, the next few parts will focus on breaking down a lot of these ideas, as I continue analysis independently and with my Friend.
You may also like
 Mradsomer
Endgame Bootcamp 9: Two Rook and Pawn Endings
What only move keeps the advantage? mullerrj
3 easy steps to help analyze your games
Playing without reviewing and analyzing your games is the slowest path to improvement. Mradsomer
Re: Endgame Bootcamp
An Addendum Mradsomer
Endgame Bootcamp 11
Queen Ending CM HGabor
How titled players lie to you
This post is a word of warning for the average club player. As the chess world is becoming increasin… Mradsomer